We're lucky in this instance, because our default audio levels are pretty good - we don't require
a whole lot of volume changes. What we definitely do need though, is a bit of stereo separation. Here's
an easy way to achieve that.
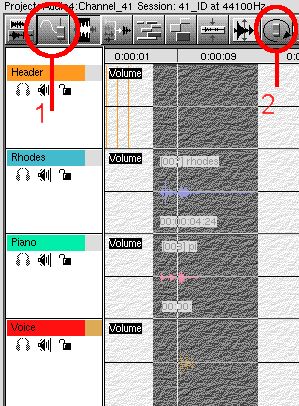
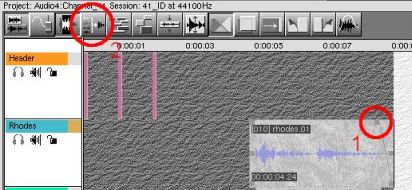
First, click on the button labeled 1 in the picture to the left. This will change the timeline
display to Automotion mode, letting you inspect your automated fades, pans, and inserts.
On the left side of each track, you will see the word Volume. This indicates the mixer function
you are currently editing. Since we want to focus on panning, click on the button marked 2 on
the image. This button cycles through all the mixer controls, Volume, Pan, and Inserts
1, 2, and 3. One click will bring us to Panning, which is where we want to
be right now.
The next step is to define the range of audio the we wish to pan. To do this, hold down the CTRL
key and drag across the selection with the mouse pointer. Choose all of the music/audio, but the
countdown tones - no panning is needed there.
You should have a selected range that looks something like the one in the image to the right.
|  |
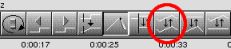 |
To make an even pan, choose the tool circled in the image at the left. This will allow you to drag the selected
range's pan either up (left) or down (right) evenly. If you needed to have an automated cross-pan or
something similar during
playback, you could use the pencil tool to draw that change as simple as that! Feel free to experiment
with this - you can always hit the T key to reset your mix to null, and start over. A good idea
for this project might be to pan the rhodes and piano slightly opposite each other.
|
|
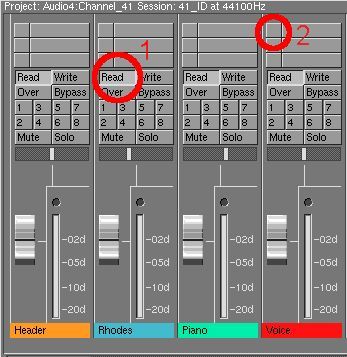
Getting the mixer to play back your pan changes is easy - click the Read button (labelled 1
in the images at right) and that channel will move as told by your automation timeline.
So, we're getting near to a completed mix. You're probably wondering where all those cool real-time
plugin effects come into play, eh? Well, since we've got some voice in our project, it might be a good
idea to load in the compression plugin. To do this, click the button labelled 2.
|
|
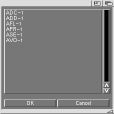 |
After clicking the button to load your plugin effect, you will be presented with a list of the
effects installed on your system, like the one at the left. The are available separately on the
Audiolabs website free of charge. Try loading the ADC-1, the
Dynamics Processor (basically a compressor).
|
|
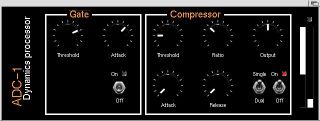
Explaining the nature of compression and the use of compressors in broadcast applications is a bit
beyond this tutorial, but feel free to play with the effect during playback - it all works in real-time!
Displayed to the right are some example settings I came up with.
|
 |
So, we've got our panning, our volumes are fine, maybe a bit of compression aded to the voice. The thing
to do now is output our work to stereo - make a finished master. We don't need an external deck
for this - ProStationAudio can handle this task for you. Here's how.
First, CTRL-Drag then range you need to master. Our Station ID project should be four seconds
long, and our sync leader is 5 seconds, so we need a total of 9 seconds ranged. After doing this, you'll notice that
the rhodes object extends a bit longer than needed, with dead air.
 |
This is not a big problem, you could leave it like this (that part is not ranged and so will not be mastered), or, if
you like, you could grab the center handle on the end of the rhodes object and drag it over to the end
of your ranged area. I did this, and then discovered that there was a tiny, audible "clip"
in the audio because the object was not perfectly cropped. Luckily, it's easy to get rid of by
throwing in a quick fade out. You can do this by grabbing the upper right handle (labeled 1 in
the image to the left) and pull it over to the left slightly. That's it - you've got a fade out!
|
Now's a good time to listen to your work - as we're about ready to commit it to a stereo master.
Hit the SPACEBAR to playback, (note: in Range mode, playback will loop) and make sure everything is how you want it.
When you're ready to master, check in the Settings menu and see if
Interleaved Output is defined. For most mastering applications, an interleaved
format is preferred (this means that the stereo output is saved to one file, as opposed to separate files for left and right channels).
Next, hit the button in the image above marked 2 - this activates
ProStationAudio's mix-to-disc feature (the hotkey for this feature is CTRL-SPACEBAR).
You will be prompted for a file format, directory and filename. After defining these, PSA will render out
the master mix with perfect digital quality - completely lossless!
Well, that's about it! Now you should have a stereo mix on your harddrive that's ready for broadcast, export to other computer platforms,
or even reloading back into ProStationAudio for inclusion in another project.
Some further notes on this tutorial.